
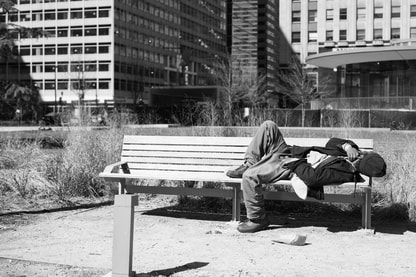
 When I do street photography, I use Aperture Priority Mode, instead of Manual Mode, (Yes, most of the time, when I shoot, I use Manual Mode). There are times when I need to control my camera in a quicker manner than Manual Mode allows—street photography is one of those times. With my camera in Aperture Priority Mode, I set a Maximum ISO (such as 1600) and watch my shutter speed (depending on your camera, you may be able to set a minimum shutter speed. I have a Sony a6000, and unfortunately it does not have that feature, so I watch my shutter speed). I don’t allow it to go below 1/250 sec. (1/125 sec. at night). I keep my shutter speed above this threshold to avoid camera shake and to keep sharp images from movement. Then all I do is adjust my aperture. I also set my camera to continuous shooting (or burst mode) for moving subjects—since I have a shake and I find there is more of a chance of getting a sharp image using this mode. As for lens, I used my 35mm f/1.8 and 50mm f/1.8 lenses. I tend to use prime lenses for street photography because they usually have a better (or wider) aperture—allowing for more light to my sensor. This means I can keep my shutter speed faster without compromising by raising my ISO (which adds noise/grain to my photos). My settings, by no means, are a rule or everybody’s settings. They are also meant to be a starting point. They change for me depending on what I’m photographing while out too. For instance, if I decide to take a panning image of a bicyclist, my technique changes completely, and I focus on my shutter speed (instead of the aperture). The one important rule that I follow and suggest you follow when shooting street photography is: Have fun!
0 Comments
Recently, I did a YouTube video about rotating your camera when you’re out shooting—that the best time to rotate your camera to a vertical/portrait orientation is right after you’ve shot a horizontal/landscape photograph and vice versa. It’s important to look at your scene from every camera angle. Somebody asked me, why would she shoot her landscapes in portrait orientation. After all, horizontal is also referred to as landscape orientation for a reason! Well, I have a couple of reasons that I can think of for turning that camera! First, you may want to switch the camera’s position if you have a subject that is vertical—perhaps a winding road going up through your picture, a waterfall, or a tall tree. It may just make more sense to have a vertical composition. You may be able to isolate the subject better and give it the proper attention it deserves by rotating the composition. Another reason you may want to shoot your image vertically is because you have a strong foreground. If you’ve composed your image with a background, mid-ground and foreground element, it can guide your viewer’s eye through the image, and it may lend itself to being a vertical photograph. There are other reasons for considering a vertical composition, such as social media posts and selling your work for stock photography and magazines. So, don’t rule out rotating your camera when you go out to shoot a landscape photograph. If you are used to one orientation in your photography (no matter what genre) I encourage you to try something different and turn that camera! 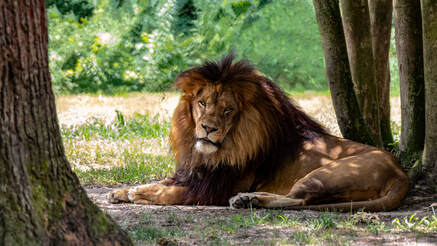 You’ll find that a Telephoto or Long Focal length lens is your friend at the zoo. Usually, you won’t find that the animals are moving quickly—like in a safari setting (after all, they’re enclosed). So, you don’t need the fancy/expensive equipment you’d need for the safari, but a long focal length with a wide aperture will help at the zoo. This combination allows for a shallow depth of field. Shallow depth of field will blur backgrounds and make netting and fences (enclosures) seem to disappear behind the animals—as well as allow you shoot right through the front of them! If the animal is far enough away from the front fencing, it will appear invisible in the picture. It’s a combination of the long focal length and wide aperture that affect the depth of field. Basically, the wider the aperture and longer the focal length the shallower the depth of field—the less fencing, netting, etc… you’d see. You may need to adjust your focus manually though, as your camera may try to focus on the fence instead of the animal behind it. Once you focus on the animal, though, the fence will disappear. I hope this tip helps you the next time you go to the zoo! While we’re all on this journey towards learning, I’d like to encourage you to pick up your camera, keep yourself and your gear safe and have a wonderful time! |
What Is This Page?Since I love photography and teaching, I thought I would start a Blog page and share how I take my images, what I was thinking and about me. Categories
All
Archives
March 2022
Ready to Order
|

 RSS Feed
Proudly powered by Weebly