
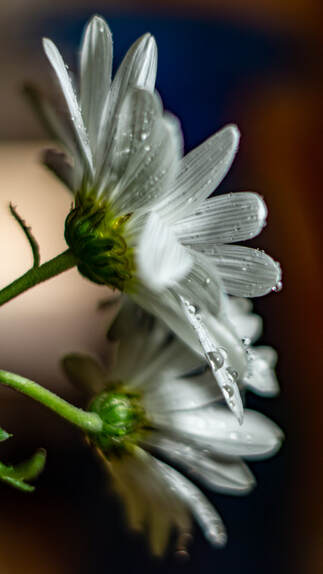
one focal length). One thing this did for me, was force me to move around and to look at my subject from all different angles. I shoot from below the subject. I shoot from above. I take shots from the front, back and side. I did this with these flowers and found that I liked this view best (this time). In this image, I happen to like that I’m on the same level as the flowers (not shooting from above or below) and like the detail that this view shows in the individual petals. Macro photography allows you to see details that you don’t normally notice when just looking at an object. Normally, I would’ve have just thought of the petals as being white, but here I can see that they look striped. There are a number of different ways to take macro photography photos. These include, but are not limited to, using a dedicated macro lens, using extension tubes and using macro lens filters. I use extension tubes. These are essentially, spacers that attach between the lens and the camera body. Using the tubes allows the magnification of the subject. When looking at my image, you’ll notice the shallow depth of field. The petals in the front of the image, as well as the flower in the background are all blurred. This is common in macro photography. Although, I could’ve chosen to have more of the image in focus by changing my settings or by taking multiple images and combining them in software, I made the decision to take this image with a shallow depth of field. I wanted the focus to be on the dew drops, and I wanted a soft appearance to the photo. I do wish that I had more of a sparkle on the water droplets. Next time, I’ll make sure to focus more on that. Want to Learn More Photography?
Click Here
1 Comment
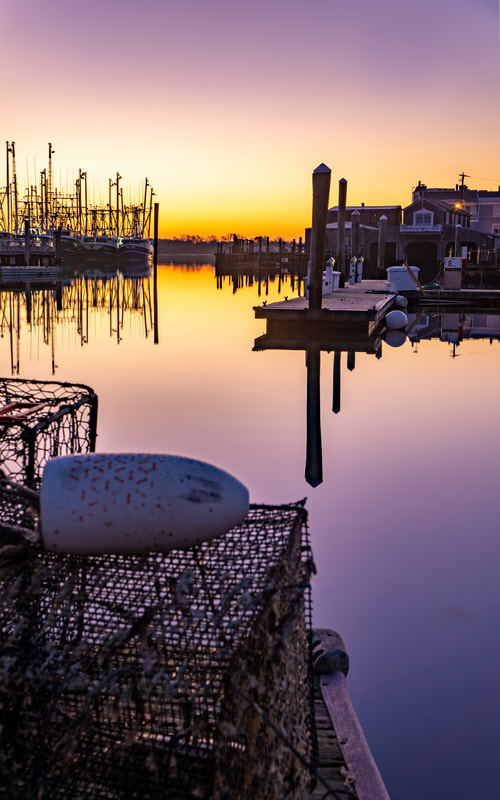
whether the image would have benefited from clouds. I don’t know if it would have cluttered the image too much or not. There already is a lot going on in the photo because of the reflections. I usually like clouds because they catch the color in the sky. In this photo, though, there was a lot of color--from purple to orange. They work well together because they are complimentary colors. This is a composition tool that I don’t tend to focus on very often—simply for the fact that I think all colors in nature work together. Perhaps if I didn’t work with landscapes so much, I’d pay closer attention to colors. I did however notice, in this instance, how the colors worked. I chose to shoot this image in a vertical (or portrait) orientation. It wasn’t a hard choice because there was a pilon that would have cut a horizontal (landscape) orientation image in half. So, to avoid it, I simply flipped my camera vertically and eliminated the pole entirely. The traps with the buoy are actually right up against the pole. Again, as I stated, I am trying to push myself outside my comfort zone, and I have. I’m sure I’ll revisit this location again in the future to continue to try to improve upon this image. |
What Is This Page?Since I love photography and teaching, I thought I would start a Blog page and share how I take my images, what I was thinking and about me. Categories
All
Archives
March 2022
Ready to Order
|
 RSS Feed
Proudly powered by Weebly