
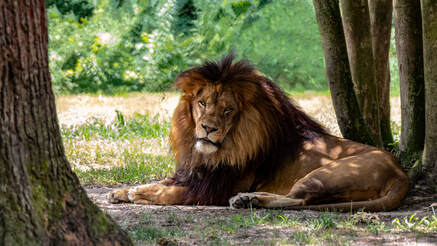
 You’ll find that a Telephoto or Long Focal length lens is your friend at the zoo. Usually, you won’t find that the animals are moving quickly—like in a safari setting (after all, they’re enclosed). So, you don’t need the fancy/expensive equipment you’d need for the safari, but a long focal length with a wide aperture will help at the zoo. This combination allows for a shallow depth of field. Shallow depth of field will blur backgrounds and make netting and fences (enclosures) seem to disappear behind the animals—as well as allow you shoot right through the front of them! If the animal is far enough away from the front fencing, it will appear invisible in the picture. It’s a combination of the long focal length and wide aperture that affect the depth of field. Basically, the wider the aperture and longer the focal length the shallower the depth of field—the less fencing, netting, etc… you’d see. You may need to adjust your focus manually though, as your camera may try to focus on the fence instead of the animal behind it. Once you focus on the animal, though, the fence will disappear. I hope this tip helps you the next time you go to the zoo! While we’re all on this journey towards learning, I’d like to encourage you to pick up your camera, keep yourself and your gear safe and have a wonderful time!
0 Comments
 Thanks to a close friend, this past Christmas, I received an OrbiteX3 Spinning LED Orbit. If you’re not familiar with this product, it is a set of blinking lights on strings that you can twirl around. It’s fun to play with on its own but when you combine it with a camera, you’ve got light painting!! Have you ever tried light painting? You don’t need any fancy equipment to paint with light. Basically, any light source will do—from flashlight to sparklers. Now, how do you light paint? First, you want to make sure that you’ve set your camera to Manual Mode with the ISO on 100. Choose a shutter speed between 10 & 30 seconds and an aperture between f/8 & f/22. Make sure your room is dark and start moving the light source around. You can make a random pattern (like I did) or outline/draw an object or write in the air (just remember to write backwards). It’s easy and fun! If you haven’t already given it a try, do so. I think you’ll enjoy it.  With the holidays upon us, I thought I would share a few suggestions for capturing special moments. The very first thing that has to happen… You must have your camera ready. That means your batteries must be charged and your camera must be clean and at hand for when those moments occur. Afterall, your camera is no good to you if it’s not readily accessible when the opportunities arise. Second, try to capture the moment from an odd angle. Don’t be afraid to experiment. Try a higher perspective or getting down on the ground. You never know when the picture from an unexpected angle will turn out to be your favorite. Remember, with digital cameras, you can always delete the images if you don’t like them. So, get creative! Third, when shooting portraits of a single individual, don’t be afraid to open your aperture up to f/2.8 (or wider, if your lens allows, such as f/1.8)). Just remember, make sure the eyes are in sharp focus. That is what’s important! The same thing applies for group shots—focus on the eyes and use a wide aperture, but I wouldn’t go wider than f/2.8 with a group shot. Last, you are taking photographs of YOUR holidays. So, make sure to include yourself in some of the images. Either hand off your camera or set it up on your tripod with a timer, whatever you feel comfortable with… Just make sure you include yourself in some of the images. And above all else, don’t become so consumed with documenting the event that you forget to participate in the event. Have fun! |
What Is This Page?Since I love photography and teaching, I thought I would start a Blog page and share how I take my images, what I was thinking and about me. Categories
All
Archives
March 2022
Ready to Order
|
 RSS Feed
Proudly powered by Weebly